Latest News Feed :
Recent Videos

Squid Proxy Video Cache Server (Adeel Ahmed)


Squid Proxy Server(Youtube,Metacafe,facebook & all video cache) 

Scripts (Scripts Source:www.aacable.wordpress.com) 


Configuration of UBNT Rocket M2 (Adeel Ahmed)


Mikrotik DDNS Access Mikrotik From Anywhere in the World (Adeel Ahmed)

Mikrotik Hotspot Quick Setup (Adeel Ahmed)

Mikrotik-PPPoE Server Quick Setup (Adeel Ahmed)

Mikrotik Non-Payment Message (Abubaker Siddiq Lasania)


Mikrotik Non-Payment Message


PPPoE Dialer for Broadband (Abubaker Siddiq Lasania)


PPPoE Dialer for Broadband


Easy Way to Create Mikrotik Hotspot Login Page (Abubaker Siddiq Lasania)


Easy Way to Create Mikrotik Hotspot Login Page


Mikrotik PPPoE Server (Abubaker Siddiq Lasania)


Mikrotik PPPoE Server


Howto create and send Backup to E-Mail automatically (Adeel Ahmed)


Create and Send Backup of Mikrotik and E-Mail Automatically 

Email Auto backup.txt


Howto create Web Cache in Mikrotik (Adeel Ahmed)


Mikrotik Web Proxy (Cache)

Mikrotik PPPoE Server and Hotspot Server (Abubaker Siddiq Lasania)


PPPoE Server & Hotspot Server Cofiguration

Windows File Sharing Full Protection (Waseem Ahmed)

COPY PROTECTED DATA!

Windows 8 Metro Style HOTSPOT Login Page (Waseem Ahmed)


LINK Uploaded SooN

User's Management System Software For Mikrotik (Shafqat Farhan)


Configure Mikrotik Within 2 Seconds In Urdu 
By Shafqat Farhan 
For further information or any question about Software please 
contact @ 0313-5260204
FULL Version Avalable Know

Config Manager For Mikrotik (Shafqat Farhan)


Configure Mikrotik Within 2 Seconds In Urdu 
By Shafqat Farhan 
For further information or any question about Software please 
contact @ 0313-5260204
FULL Version Avalable Know

Xampp Server Complate Traning With Fix (Zohaib Bin Khalid)


Fixed Error Of Xamp Media Server Template (Bellow Video)


Movie PHP Script Version 2.2 Full Script.rar

Hotspot Different Limits and Traffic Priorities (Xishan Ali Raza)


== Introduction == 

Many users are always asking about how to prioritize the traffic using the Mikrotik RouterOS Hotspot service.

The following method helps to manage the network traffic and customize it the way you want. It also insure to provide the correct service for a specific use in a big network, giving priority for the VIPs, Special users or services in a congested network.

Also, you can use the same method if you want to make sure that heavy users should not keep downloading or uploading files for long period in order to save the rest of available traffic for light users who are looking for good speed for browsing or occasionally access. This can be applied using the burst limit or a combination of minimum and burst limit with priority.

The trick with bandwidth management in Hotspot is to use the Users Profiles, and assign the different type of speeds that is related to a specific group.

== The question is, How to do that? ==

Using the Winbox, in: IP >> Hotspot >> User Profiles >> rate limit:

use the following string: x1k/y1k x2k/y2k x3k/y3k x5/y5 P x6k/y6k


where:
x1k/y1k: Rate (txrate/rxrate i.e 128k/1024k)
x2k/y2k: Burst Rate (i.e 256k/2048k)
x3k/y3k: Burst Threshold (i.e 160k/1280k)
x5/y5: Burst Time (in seconds i.e: 60/60)
Priority: P (use integer from 1-8)
Minimum rate: x6k/y6k (i.e 32k/256k)

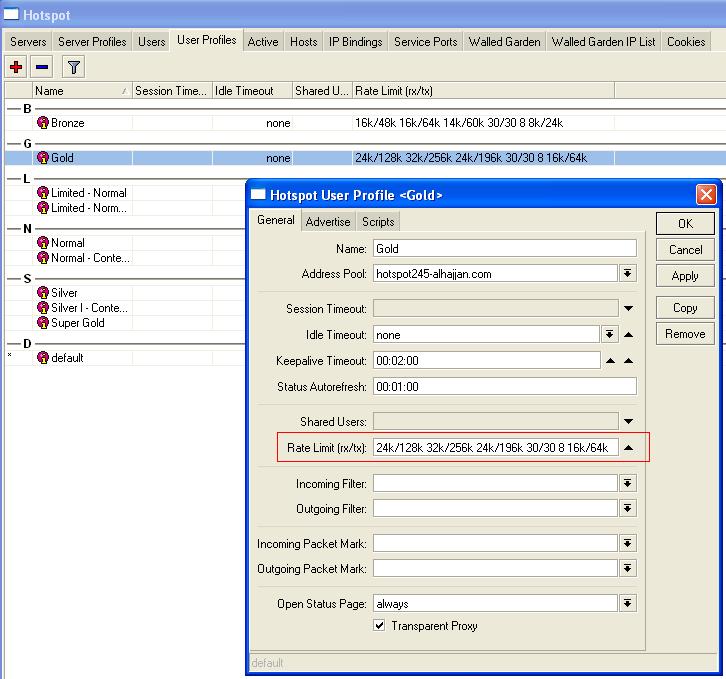
for example: 24k/128k 32k/256k 24k/196k 30/30 8 16k/64k

The following example show you what you have to do exactly:


means:
Rate:24k/128k
Burst Rate: 32k/256k
Burst Threshold: 24k/196k
Burst Time: 30/30
Priority: 8
Minimum rate: 16k/64k

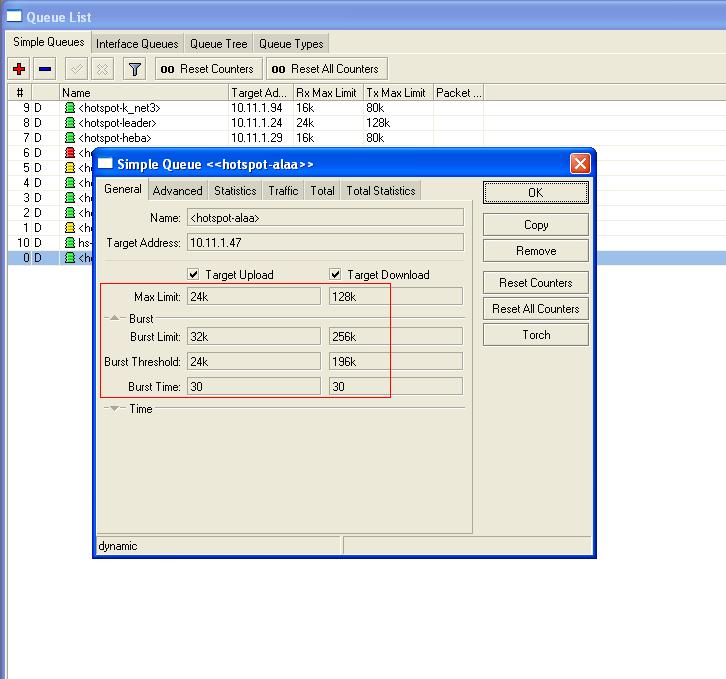
In Queues table, you can see what happened exactly for the user having the same profile:


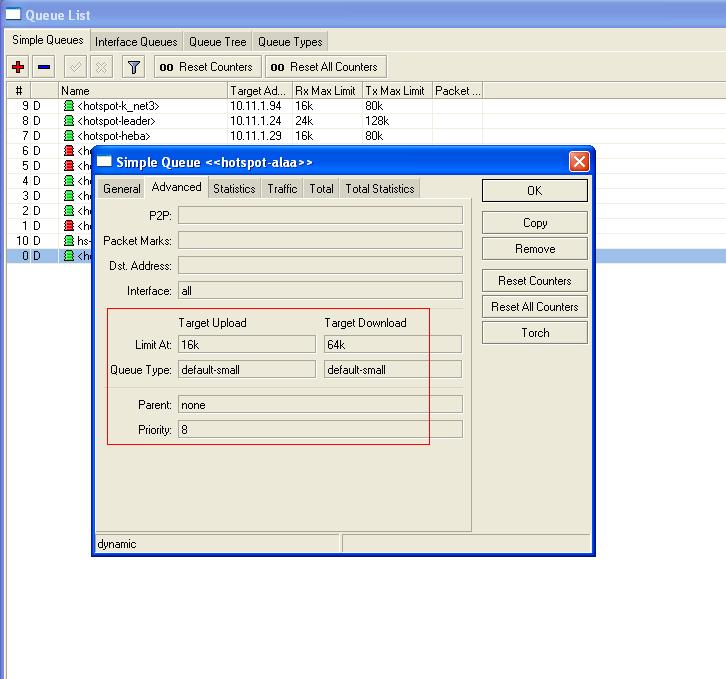
Also, you can check the configured priority here:

if you just want to use rate and priority, then use:
Rate, Burst Rate, Burst Priority, Minimum rate.

XAMPP Server (Waseem Ahmed)


How to Install XAMPP for Windows


XAMPP for Windows provides an easy to install Apache-MySQL-PHP-PERL-PEAR framework. XAMPP saves time and effort and provides the software support for web frameworks like Drupal, Joomla, Moodle, or wikiMedia on any Windows PC.

Steps

  1. Install XAMPP for Windows Step 1.jpg
    1
    In your web browser, go to http://www.apachefriends.org/en/xampp-windows.html
  2. Install XAMPP for Windows Step 2.jpg
    2
    Click on the download link for XAMPP.
  3. Install XAMPP for Windows Step 3.jpg
    3
    When prompted for the download, click "Save" and wait for your download to finish.
  4. Install XAMPP for Windows Step 4.jpg
    4
    Once your download is complete, install the program, click on "Run"
  5. Install XAMPP for Windows Step 5.jpg
    5
    Accept the default settings. A command will open and offer an initial installation prompt. Just hit the Enter key, and accept the default settings. To simplify installation, just hit ENTER when prompted on the command line. You can always change settings, by editing the configuration files later.
  6. Install XAMPP for Windows Step 6.jpg
    6
    When your installation is complete, exit the command window by typing x on the command line.
  7. Install XAMPP for Windows Step 7.jpg
    7
    Start the XAMPP Control Panel.
  8. Install XAMPP for Windows Step 8.jpg
    8
    Start the Apache and MySQL components. You can also start the other components, if you plan to use them.
  9. Install XAMPP for Windows Step 9.jpg
    9
    Verify the Apache install, by clicking on the Apache administrative link in the Control Panel.
  10. Install XAMPP for Windows Step 10.jpg
    10
    Verify the MySQL installation, by clicking on the MySQL administrative link in the XAMPP Control Panel.
    • If the verification steps are successful, XAMPP should be successfully installed on your PC. Open a browser and enter "localhost" on your address bar. You will be redirected to a page telling you that you've successfully installed xampp on your system
      Install XAMPP for Windows Step 10Bullet1.jpg


Tips

  • If you are web-development newcomer, get a good book on Apache-MySQL-PHP.
  • Read the installation instructions on the XAMPP home page. There is a lot of good information provided on the page.
  • Download the XAMPP documentation to understand how XAMPP is organized. As a serious web developer this information is an invaluable tool.

Warnings

  • There may be minor issues when running Skype and XAMPP at the same time, due to Skype's use of port 80.
No. And Apache::ASP with the Perl Add-On is not the same. Apache::ASP only knows Perl-Script, but ASP from the Internet Information Server (IIS) also knows the normal VBScript. But for ASP .NET, there is a 3rd party Apache module available.

MT-Link AP/Router Configuration (Adnan Netway Store)

Features

  • Comply with IEEE802.11n/g/b, IEEE802.310Base-T, IEEE802.3u 100Base-TX standards
  • Provides up to 3 times the transmission rate and double the range of 802.11g products
  • Supports 64/128-bit WEP, WPA and WPA2 wireless security modes
  • WPS (PIN/PBC) enabled
  • Support DHCP Client, PPPoE Client, Russian PPoE, Static IP, PPTP Dynamic/Static
  • Support Option 121 and 249
  • Support multi-wireless mode: AP, WDS, AP+WDS, repeater, client
  • Support MAC filtering, IP access control, DNS filter
  • Support FTP, PPTP and L2TP pass through
  • Support UPNP (universal plug and play)
  • Upgradeable firmware for future functions
  • Support WMM
  • Support DMZ

Download
MT-WR761N Firmware

NetInstall Training (Xishan Ali Raza)


Description

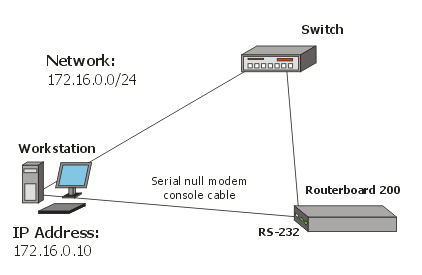
NetInstall is a program that allows you to install MikroTiK RouterOS on a dedicated PC or RouterBoard via Ethernet network. All you need is a blank floppy or an Ethernet device that supports PXE (like RouterBoard 100, RouterBoard 200 and RouterBoard 500 series), an Ethernet network between workstation and dedicated computer, and a serial null-modem console cable (for RouterBoard routers).
NetInstall Program Parameters
The program runs on Windows 95/98/ME/NT/2000/XP platforms.
Netinstall parameters:
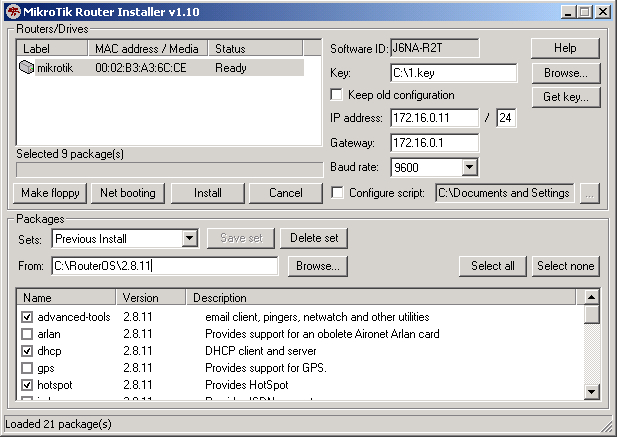
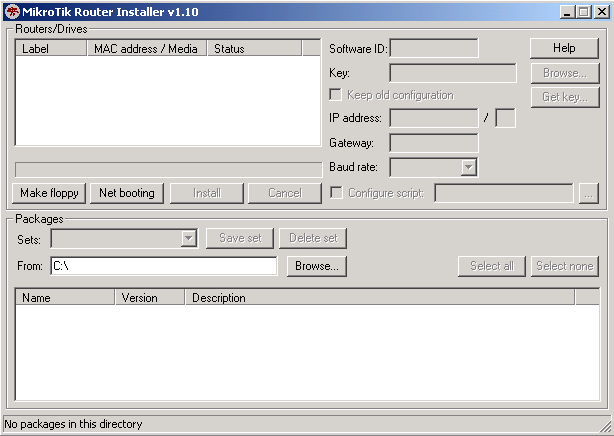
  • Routers/Drives - in this list you can see all the devices waiting for installation.
  • Software ID - a unique ID that is generated for licensing purposes.
  • Key - a key that is generated for the Software ID. When you purchase a license, you get a key file. Click the Browse... button next to the key field to select your key file.
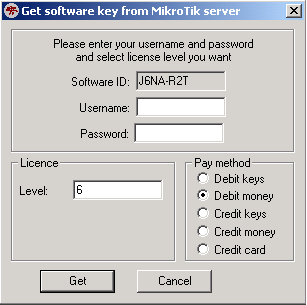
  • Get Key... - obtain software key from MikroTIK server:
    • Software ID - ID for which the key will be generated (depending on the license level).
    • Username - client's username in the Account data base.
    • Password - client's password.
    • Level - license level of RouterOS.
    • Debit key - a key that you have paid for, but haven't generated yet.
    • Debit money - money that you have on your account. To add money to your account, use the 'add debit' link in the account server.
    • Credit key - a key that you can take now, but pay later.
    • Credit money - paying with credit money allows you to get your keys now and pay for them later.
  • Keep old configuration - used for reinstalling the software. If checked, the old configuration on the router will not be overwritten, otherwise it will be lost.
  • IP address/mask - address with subnet mask that will be assigned to ether1 interface after the packages are installed.
  • Gateway - specifies the default gateway (static route).
  • Baud rate - this baud rate will be set for serial console (bps).
  • Configure script - a RouterOS script to execute after the package installation. Note that not all the devices (especially, wireless cards) may be discovered at the time this script is run, so it is suggested to put a delay (about 20 seconds) at the start of the script to be sure that all devices are up and running.
  • Make floppy - make a bootable NetInstall floppy.
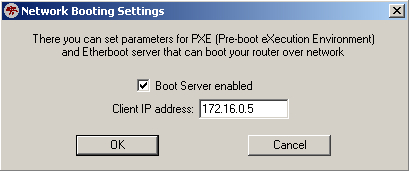
  • Net booting - opens the Network Booting Settings window. Enter an IP address from your local network. This address will be temporarily assigned to the computer where RouterOS will be installed on.
  • Install - installs the RouterOS on a computer.
  • Cancel - cancel the installation.
  • Sets - an entry in this list represents the choice of packages selected to install from a directory. If you want to make your own set, browse for a folder that contains packages (*.npk files), select needed packages in the list, and press the Save set button.
  • From - type the directory where your packages are stored or press the Browse... button to select the directory.
  • Select all - selects all packages in the list
  • Select none - unselects all packages in the list
Note: some of the Get key... parameters could not be available for all account types.
NetInstall Example
This example shows step-by-step instructions how to install the software on a RouterBoard 200.
  1. Connect the routerboard to a switch (or a hub) as it is shown in the diagram using ether1 interface (on RouterBoard 230 it is next to the RS-232 interface):
  2. Run NetInstall program on your workstation (you can download it here. It is necessary to extract the packages (*.npk files) on your hard drive.
    NetInstall v1.10
  3. Enter the Boot Server Client's IP address. Use an address from a network to which belongs your NIC (in this case 172.16.0.0/24). This IP address will be temporarily assigned to the routerboard.
  4. Set the RouterBoard to boot from Ethernet interface. To do this, enter the RouterBoard BIOS (press any key when prompted):
    RouterBIOS v1.3.0 MikroTik (tm) 2003-2004
    
    RouterBOARD 230 (CPU revision B1)
    CPU frequency: 266 MHz
     Memory size: 64 MB
    
    Press any key within 1 second to enter setup.
    You will see a list of available commands. To set up the boot device, press the 'o' key:
    RouterBIOS v1.3.0
    What do you want to configure?
     d - boot delay
     k - boot key
     s - serial console
     l - debug level
     o - boot device
     b - beep on boot
     v - vga to serial
     t - ata translation
     p - memory settings
     m - memory test
     u - cpu mode
     f - pci back-off
     r - reset configuration
     g - bios upgrade through serial port
     c - bios license information
     x - exit setup
    your choice: o - boot device
    Press the 'e' key to make the RouterBoard to boot from Ethernet interface:
    Select boot device:
     * i - IDE
     e - Etherboot
     1 - Etherboot (timeout 15s), IDE
     2 - Etherboot (timeout 1m), IDE
     3 - Etherboot (timeout 5m), IDE
     4 - Etherboot (timeout 30m), IDE
     5 - IDE, try Etherboot first on next boot (15s)
     6 - IDE, try Etherboot first on next boot (1m)
     7 - IDE, try Etherboot first on next boot (5m)
     8 - IDE, try Etherboot first on next boot (30m)
    your choice: e - Etherboot
    When this is done, the RouterBoard BIOS will return to the first menu. Press the 'x' key to exit from BIOS. The router will reboot.
  5. When booting up, the RouterBoard will try to boot from its Ethernet device. If successful, the Workstation will give to this RouterBoard an IP address, specified in Network Booting Settings. After this process, the RouterBoard will be waiting for installation.
    On the workstation, there will appear a new entry in Routers/Drives list:

    You can identify the router by MAC address in the list. Click on the desired entry and you will be able to configure installation parameters.
    When done, press the Install button to install RouterOS.
  6. When the installation process has finished, press 'Enter' on the console or 'Reboot' button in the NetInstall program. Remember to set the boot device back to IDE in the RouterBoard BIOS.

HFS Traning (Adeel Ahmed)

Video Training


HFS(HTTP File Server)

HTTP File Server, otherwise known as HFS, is a free web server specifically designed for publishing and sharing files. The complete feature set differs from other web servers; it lacks some common features, like CGI, or even ability to run as a Windows service, but includes, for example, counting file downloads. It is even advised against using it as an ordinary web server


Features

HFS is a small HTTP file server, aimed at mostly sharing files for download.
The official documentation describes HFS as:

  1. HFS (Http File Server) is file sharing software which allows you to send and receive files. You can limit this sharing to just a few friends, or be open to the whole world.
  2. HFS is different from classic file sharing because there is no network. HFS is a web server which uses web technology to be more compatible with today's Internet.
  3. Since it is actually a web server, your friends can download files as if they were downloading from a website using a web browser, such as Internet Explorer or Firefox. Your users don't have to install any new software.
  4. HFS lets you share your files. Most web servers are used to publish a website, but HFS is not designed to do that. You are, however, free to use it in any way you wish, - but at your own risk.
As of the latest beta version 2.3, HFS includes its own proprietary scripting language known as "macros", which can be used to expand functionality of the program. Scripts can be used in a variety of methods including event handlers and directly on web pages. Macros can even be written to bypass the program's account system with a custom one.HFS can be used as a typical web-server, however it is not easy to support and requires a variety of unconventional programming methods (version 2.3 only), due to its lack of support for PHP or CGI.


Support : PAK KASHMIR-ISP | Deallink | Net Biz
Copyright © 2011. ALL PAKISTAN - ISP - All Rights Reserved
Designed by: Xishan Ali Raza,Waseem Ahmed,Muhammad Salahuddin
Proudly powered by Blogger